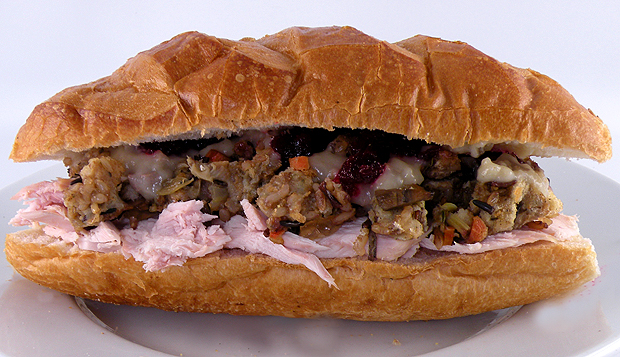
Ginger Lemon Tea

gina-tea-booksWith allergy season upon us, not only am I dealing with a nasty case of sniffles and scratchy throat but I have somehow managed to catch a cold on top of it. Here is my remedy to soothe my aliments and help lessen the duration of my discomfort…or at least I keep telling myself that. Homemade ginger lemon tea with honey is a delicious and easy way to help me through the unpleasant times.  Regardless, if it doesn’t relieve my symptoms, at least it is comforting to curl up with a good book and sip ginger tea.

Here is my recipe. I like to make one cup at time so it is very fresh. I also don’t like an overpowering ginger flavor so you can add more ginger if you like a spicier tea.

Ingredients:

ginger-tea-ingredients

  • 2 slices peeled fresh ginger root ( I like only a hint of ginger so add more if you would like it stronger.)
  • 1 lemon wedge about 1/8 of a fresh lemon
  • 1-2 teaspoons honey or to taste

Directions:

Step 1: Add ginger slices to a decorative tea cup. (Pretty tea cups make you feel better too!)

tea-lemon

Step 2: Squeeze lemon into the tea cup.

tea-honey

Step 3: Drizzle honey over the ginger.

tea-cover

Step 4: Pour boiling water into the cup, cover and let steep for 10 minutes.

Step 5: Stir to meld the flavors together and release the ginger into the tea.

Enjoy!

You can make variations of this recipe by substituting the lemon with orange, lime or even grapefruit juice. For a stronger ginger taste, add ginger slices to water and boil for 10 minutes  before mixing in the lemon and honey to add that extra zing to your tea.

Posted in Everything, Food | Tagged , , , , , , , , | Leave a comment

What’s Playing in Your iPod?

Chill-out-music

You can learn a lot about a person by their taste in music.  I find myself listening to different music genres depending on my mood. Although I love all types of music, some of my most creative times are when I am working in my basement studio at night, listening to instrumental music without or with very few words. This style of music is extremely thought provoking and inspirational. Somehow it seems to pull creative images out of my mind that I would not have had if I was distracted by singing. In order to clear my head to be my most artistic, I like my music to be somewhat somber and chill.

I would love to hear what type of music you like and when you like to listen to it.

Some of my instrumental favorites are:

Øystein Sevåg

#1 – Link
#2 – Bridge

I get absorbed into his amazing instrumentals that are played with such emotion.

Here is a link to one of the songs I love:

Gustavo Santaolalla

#3 – Ronroco

His rapid picking and strumming of strings create such a beautiful and thought provoking sound.

This song was featured in multiple movie soundtracks:

Moby

#4 – Moby Wait for Me
#5 – Moby Destroyed

What can I say…I just love Moby! I am addicted to these two CDs while I design my projects.

Here is one of the songs from the Destroyed CD:

Posted in music | Tagged , , , , , , , , | Leave a comment

Earth Day Crafts

Here are some of my Earth Day projects created from household items and repurposed materials. I always love showing how to create fun and beautiful crafts out of items that are usually discarded and thought of as trash. I think Lisa at WBAL was a little surprised at my wrapping paper roll cuff bracelets and milk carton vases.

Posted in Cards, Crafts, Everything, gifts, holidays, Media, Recycle | Tagged , , , , , , , , , , , , | Leave a comment

Black Tie Gift Design

Black Tie Gift Wrap Designs

My Guest Blogger Wedding Gift Wrap Design for Nashville Wraps.

I have always loved themed gift wrap — it is an unexpected way to decorate a gift and just makes people smile. I was walking by a tuxedo rental store at the mall and saw all of the styles of tuxes shown on the wall as options to choose from. I was instantly inspired to create a gift box design perfect for a groom or groomsmen using a tuxedo as the presentation. It is easy to create this look and will hold any type of gift with Nashville wraps large selection of black boxes.  The Pearl Stripe Gift Wrap looks like an expensive tuxedo shirt and the Double Faced Satin Ribbon gives the bow tie a crisp and classic style. I finished the design with black shiny beads to simulate buttons. I have created the Black Tie gift design so any of these styles shown can be reused after the gift it open — this also allows for the gift wrapping to be in done in advance. They will not only dazzle any wedding party but also add sophistication to a black tie gala event.

Materials Used for the Black Tie Gift Designs

Black-Tie-Materials


How to Create a Bow Tie

bow

This bow tie design will work on any size of the Nashville Wraps black boxes, gift bags or pillow boxes for the Black Tie design. I used 5/8” BLACK Double Faced Satin Ribbon.

bow-1Step 1: Cut a 6-inch piece of black satin ribbon. Fold the ends to middle, overlapping about 1/4 inch, and glue to form a loop.

bow2Step 2: Apply glue to the inside center and press together to form two loops.

bow3

Step 3: Cut a 2-1/4 inch piece of ribbon and place the right side of the double loop bow face down on to the piece of ribbon.

bowStep 4: Apply glue to each end of the ribbon piece and fold over to form a bow.

Jewelry Box Design

Black-Tie-Jewelry

The Black Jewelry Boxes are very sturdy and can be saved and can be reused after the gift is opened.

Instructions

jewlry-box-1

Step 1: Cut a piece of the Pearl Stripe Gift Wrap 1-1/2 inch smaller than the width and the entire length measurement of the lid of the box.

Step 2: Apply glue stick to the wrong side of the wrapping paper, especially around the edges. Attach the craft paper to the top of the lid, centering the paper evenly.

jewelry-box-3jewlry-box-2

Step 3: Cut a piece of the black satin ribbon the length of the top and sides of the lid of the box plus 1 inch.

Step 4: Glue one end of the ribbon 1/4 inch from the long end of the box on the inside of the lid (as shown above).

Step 5: Attach the remaining length of ribbon around the top of the lid with craft glue, securing the other end on the inside of the lid.

Black-Tie-JewelryStep 6: Glue the bow onto the center of the black satin ribbon and attach three black beads, evenly spaced, on middle of the box directly centered under the bow to complete the design.

Gift Bag Design

gift-bag

This Black Tie gift bag is a very elegant design — the layered tissue paper adds height to the presentation that makes it look extra fancy. 

Instructions

gift-bag-1

Step 1:Cut a piece of the Pearl Stripe Gift Wrap 1 inch smaller than the length and the 1 inch smaller than width of the front of the gift bag.

Step 2: On the wrong side of the wrapping paper, mark the center of one of the short edges and draw a line from each of the corners on the opposite short end to the center mark to form a triangle. Cut along the lines.

Step 3: Apply glue to the wrong side of the craft paper especially around the edges. Attach the paper to the front of the gift bag, lining up the edges of the paper with the top edge of the bag.

gift-bag-2

Step 4: Cut a piece of the black satin ribbon the entire width of the front of the gift bag. Glue the ribbon to the front of the gift bag 1 inch from the top. Add small amounts of glue to the cut edges of each side of the ribbon to prevent fraying.

gift-bag-3

Step 5: Glue the bow onto the center of the black satin ribbon on the top of the bag and attach the 4 black buttons, evenly spaced, on middle of the bag directly centered under the bow.

Step 6: Fill the bag with layered black and white tissue paper to finish the design.

Gift Box Design

box

The Black Gloss Gift Boxes are easy to decorate and are a great way to display your design.  I like to place the tuxedo on the front of the box so it can be seen from across the room.

Instructions

Step 1: Cut a piece of the Pearl Stripe Gift Wrap 1-1/2 inch smaller than the width of the front of the box and the length measurement of the front of the box.

Step 2: Apply glue stick to the wrong side of the wrapping paper, especially around the edges. Attach the wrapping paper to the box, centering the paper evenly on the top of the box.

Step 3: Cut a few slits in the paper where it meets the front notch of the box and fold in, gluing the extra flaps of paper on the inside of the box.

box-2

box-1

Step 4: Cut a piece of the black satin ribbon long enough to wrap around the entire box plus 1 inch. Attach the piece of ribbon around the box, 1 inch from the top and glue the overlapping ends on the front center of the box.

Step 5: Glue the bow onto the center of the black satin ribbon and attach the 3 black buttons, evenly spaced, on the front of the box, directly centered under the bow.

Pillow Box Design

pillow-box

The Black Tie design on the Pillow Box is super cute because the curve on the top of the box resembles the neckline of the tuxedo shirt.

Step 1: Cut a piece of the Pearl Stripe Gift Wrap 1 inch smaller than the length and the 1 inch smaller than width of the front of the pillow box.

Step 2: On the wrong side of the wrapping paper, mark the center of one of the short edges and draw a line from each of the corners on the opposite short end to the center mark to form a triangle. Cut along the lines.

Step 3: Apply glue stick to the wrong side of the wrapping paper especially around the edges. Attach the paper to the front of the pillow box, lining up the edges of the paper with the top edges of the pillow box.

pillow-box-1

Step 4: Trim the top edge of the wrapping paper to match the curve of the box.

pillow box 2

Step 5: Cut a piece of the black satin ribbon long enough to wrap around the entire pillow box plus 1 inch. Wrap the piece of ribbon around the box, ½ inch from the top and glue the overlapping ends on the front center of the box.

Step 6: Glue the bow onto the center of the black satin ribbon and attach the 3 black buttons, evenly spaced, on middle of the bag directly centered under the bow.

Posted in Everything, Gift Wrapping, gifts, Wedding | Tagged , , , , , , , | Leave a comment

Repurposing Picture Frames

Place-Setting-Frame

Have you ever been in the situation where glass in your picture frame breaks or a frame gets damaged so you can no longer use it? Or maybe you just got tired of the frame or received it as a gift and it didn’t match your decorations. In celebration of the upcoming Earth Day, here are some of my ideas on how to repurpose old picture frames and turn them into something other than a way to display your photo memories.

Picture Frame Charger

I had some old wooden frames that were just waiting to be transformed into something beautiful and unique. I decided to use them as chargers to dress up my table for a fancy dinner (seen in here in my Thanksgiving video). This would also look very nice at a wedding reception or bridal shower.

All you need to make the picture frame charger is:

  • Old Picture Frame (the size for a serving platter or plate to rest nicely on the edges of the frame)
  • Yarn or Twine
  • Craft Glue
  • Textured Ribbon or Rope
  • Metallic Spray Paint

Frame-Brown

Step 1: Glue the textured rope or ribbon around the entire frame about 1/4 inch  from the inside of the frame opening.

Step 2: Coil the twine around itself to make a circle and attach with glue on the corner of the frame.

Step 3: Draw a curvy line on the frame with glue and then attach the twine as shown above. Continue this process adding coiled circles to each corner and curvy lines to each side of the frame.

Gold-Frame

Step 4: Once the glue is dry. Spray paint the frame to give it a gilded look. If you still have the glass for the frame, you can use the newly transformed frame to display a photo taken from the event after it has served it’s purpose as a charger.

Picture Frame Chalkboard

Chalk-Board-Frame

Another great way to repurpose a frame that has broken glass is to create a chalkboard. This will help lessen the sting if you are particularly fond the frame that was broken. Chalkboards are a great way to remind yourself of things you need to do or you can write yourself fun inspirational notes each day. Rather than fumbling around looking for a pen and something to write on, you have an instant notepad without wasting paper.

I like to have my chalkboard in the kitchen or near my front door. I write notes to remind myself of important things I need so I don’t forget them on the way out. This would also be great for kids in school to help them to remember important events, homework or tests.

All you need to create the chalkboard frame is:

  • Picture frame
  • Foam board or sturdy smooth surface cardboard
  • Chalkboard spray paint (available at craft stores)

Step 1: Cut a piece of foam board the size to fit the inside of the frame.

Step 2: 

  • Spray an even coat of the chalkboard paint onto the foam board and let dry. Repeat with the second coat and let dry.

Step 3: 

  • Fit the piece of foam board into the frame as you would a picture. Make sure it fits in tight so the chalkboard does not move when you are writing on it. It’s that easy. Enjoy!
  • Blue-Frame
  • You can also use small metal frame and attach a piece of chalk with a string,  securing it  on the back of the frame. It can be used in lockers or near a phone for quick access when you need it.

Seating Arrangement Picture Frames

seating-arrangement1

You can use small picture frames for seating arrangement for a dinner party, wedding or any event where you want to designate where you would like people to sit. You can also write the names of the food you are serving and place them on a buffet table. The frames do not have to match — it actually will look better if the all are a different color and design. I like to decorate pieces of chalk with decorative paper and ribbon to place on the table so my guest can play with the chalkboard after they eat. Who doesn’t love to write on a chalkboard?

To create these mini chalkboard frames, just follow the directions above for the Picture Frame Chalkboard.

Paper Chalkboard

chalkboard-menuHere is an idea I created for my Raven’s Championship Party on WBAL to show how to celebrate Raven’s style. Rather than used chalkboard paint, I cut a piece of sturdy black card stock and fit it into the frame. You can write on it like you would a chalkboard,  using either chalk or a white marker which you can buy at your local craft store. This is a great way to display a listing of food you will be having at your event without the time spent to actually make a real chalkboard.

I hope you enjoyed this post and happy reusing!

Posted in Crafts, Everything, holidays, Recycle | Tagged , , , , , , , , , , | Leave a comment

When Pigs Fly…

kite-1I didn’t  realize that there is actually a national month for kites. I had already bought some Angry Birds kites from Toys-R-Us to fly with the kids as soon as the weather became a little more spring like. Since the kids are on Spring Break this week, we went to the lake to test them out. It was a little windier than I would have liked — the kites kept spiraling around and taking a nose dive. The kids were naturals though. I was especially surprised with my four year old who had a knack for kite flying. I can’t remember the last time I flew a kite. I guess I must have been a kid. It was so much fun. I definitely recommend doing it. It is very relaxing and fun to be one with the wind. When was the last time you flew a kite?

Happy National Kite Month!

kite-6

Keep running…it’s starting to fly.

kite-4

 Watch out for the tree!

kite-3Yeah!! The blue bird is flying!

kite-7

The pig is flying!

kite-5

Chilling with a flying pig.

kite-2

Angry Bird in flight.

Posted in Everything, kids | Tagged , , , , , , , , , | Leave a comment

Repurposed Aluminum Foil Box

Map-Box-2April 22 is Earth Day this year so I thought I would share some of my reuse projects to show how to Reduce, Reuse and Recycle and also my favorite…Repurpose. As many of you may already know about my style is that I love to repurpose items to incorporate into my designs. When I think of Earth Day, it makes me want to reuse and recreate things normally discarded into something useful and unexpected. I think that is the charm of project made with reused items is that it invites you to take a second look and makes you think about how it was created. This design I created from an aluminum foil box and added ocean elements to give it a nautical, earthy look. This project uses the same technique as my Plastic Wrap Gift Box design.

I will be posting some of my repurposed designs all month to celebrate Earth Day. If you have any you would like to share, please send me some pictures and I will post them on my blog.

Materials

Map-Box-Materials

  • Foil or Plastic Wrap Box
  • Duct Tape
  • Maps
  • Shells
  • Sea Glass
  • Natural Twine
  • Craft Glue

pw1Step 1: Remove the metal blade from the box. Be careful not to cut yourself or tear the box.

Map-Box-5

Step 2: Wrap pieces of duct tape around the box. Cover entire top, sides and bottom. This will made the box very sturdy so it can be reused to hold keepsakes.

Step 3: Trim the side pieces of duct tape to match the shape of the box. It is easier to do this once the tape is already on the box.

Map-Box-4

Step 4: Cut a piece of the map the size to fit around the entire box. Cover the box with the the piece of map and attach with craft glue.

Map-Box-3

Step 5: Cut four pieces of twine the length of the top of the box. Put two pieces of twine together and tie knots on each side of the twine about 1/2 inch from the ends. Repeat with the other two pieces.

Map-Box-2

Step 6: Attach the knotted twine on the top of the box with craft glue. Position the shells on top of the twine and glue.

Step 7: Glue the sea glass on the front  of the box to simulate a latch. Let dry.

Map-Box

This box is perfect for holding odd and ends or placed on a desk for writing instruments. It can be a great gift box and then reused as a functional yet decorative box. I don’t think anyone would know it originally held plastic wrap or aluminum foil.

Posted in Crafts, Everything, Gift Wrapping, Recycle | Tagged , , , , , , , , , , | Leave a comment

Handmade Seeded Paper

Seeded-paper-new1

Spring is finally here! Everything is starting to grow and turn green. In the spirit of this glorious season, I created seeded paper made from junk mail, scraps of paper and natural elements. I embedded flower petals, leaves and flower seeds into each page. It is so versatile that it can be used for note cards, birthday cards or anything else where you want to use natural paper. This is the ultimate in reuse project. It transforms waste paper into something beautiful that can be recycled again by planting it in the ground…that is if you want to part with the beautiful paper.

To make your paper, you first need to make a screen which also acts as the form for the paper. This can easily be done with things you may already have on-hand. Once the screen is made, you can quickly and easily make paper whenever you want.  This paper is a very kid friendly craft as well…I made the paper shown above with my six year old.

Click here for instructions on how to make seeded paper

Posted in Cards, Crafts, Everything, kids, Recycle | Tagged , , , , , , , , | Leave a comment

Decoupage Egg Shakers

egg-shakers

Now that Easter is over, here is a fun thing to do with all of those leftover plastic eggs. One idea I had is to make decoupage egg shakers. This is a great project to make with kids and they are very easy to create. These are a lot of fun to use as musical instruments to play along with music or just use as a pretty decoration. Everything you need to make these you probably already have in your house.  If your kids are on spring break like mine, it will be a great craft activity.

Materials

egg-shakers5

  • Plastic Eggs
  • Rice, Beads or Sand
  • Decorative paper (scrapbooking paper, tissue paper, maps, magazines, etc.)
  • White Glue
  • Paint Brush
  • Plastic Cup  and Egg Holder (I reuse snack cups to mix my glue and hold my eggs)

Instructions

egg-shakers-1

Step 1: Add some rice or beads to the egg. You don’t need much to give it a nice shaking sound. Experiment with items from around the house to give each egg a different sound.

Step 2: Add some white glue around the rim of the egg and fit the top and bottom sections together. Wipe off the excess glue with a paper towel.

egg-shakers-2

Step 3: Mix some glue and water together in a small cup (I like to reuse snack cups) to make your decoupage medium. The ratio should be 3 parts glue to 1 part water.

  • egg-shakers-3

    Step 4: Cut or tear strips of decorative paper and use a brush to spread the decoupage medium over the surface. Continue to add paper to the egg until the entire egg is covered.

    Step 5: Use the paintbrush to smooth out any bubble and wrinkles. Let dry overnight.

     
    egg-shakers4

Posted in Crafts, Everything, kids, Recycle | Tagged , , , , , , , , , , , | Leave a comment

Moss Covered Basket

moss-basket-3

I have been seeing moss covered baskets everywhere this spring…at home and crafting stores, hardware stores and even at the grocery store. They are very pretty but even the plain ones carry a hefty price tag of at least $20. I thought I would try to make one myself using some household items and inexpensive materials.  I used an apple juice bottle and natural elements to create my rustic spring basket. The reused bottle created such an interesting shape for my basket. Because the inside is plastic, it would be easy to put a planter inside without worrying water damage. At first glance, I don’t think anyone would know that it was once a plastic bottle filled with apple juice.

Materials

Moss-basket-1

  • 64 ounce juice or water bottle
  • Moss cloth (available at craft stores – don’t forget to use a 40% off coupon!)
  • Thin twigs
  • Decorative vine with flowers
  • Natural filler (I used decorative Excelsior but any natural filler will work)
  • Decorative bird (I purchased one at the dollar store)
  • Glue gun

Instructions

basket-2

Step 1: Remove the label from the bottle. Don’t worry about cleaning any glue residue because the entire bottle will be covered with moss.

Step 2: Cut out the center front and back of the bottle with scissors. Leave the top, sides and bottom part of the bottle so it resembles a basket as shown above.

moss-basket-9

Step 3: Cut a piece of the moss cloth the size to wrap around the entire bottom part of the bottle.

moss-basket-8

Step 4: Using a glue gun, add glue to the moss, a few inches at a time, and attach to the bottom part of the bottle.

moss-basket-6

Step 5: Cut a piece of moss the size of the handle and attach with glue gun.

Step 6: Wrap the moss around the mouth of the bottle. Repeat on the other side and on the inside of the handle.

moss-basket-7

Step 7: Glue loose pieces of moss around the basket to fill in the holes.

moss-basket-10

Step 8: Using the glue gun, attach vines and twigs to the moss covered basket.

moss-basket-4moss-basket-5

Step 9: Fill the basket with natural fibers and a cute little bird to finish your design. This can be also be used as a spring decoration even after Easter is over.

Related Posts Plugin for WordPress, Blogger...
Posted in Crafts, Easter, Everything, holidays, Recycle | Tagged , , , , , , , , , , | Leave a comment