How to Make Handmade Paper (Using Junk Mail)
Have you ever wanted to learn how to make handmade paper? Spring is finally here! Everything is starting to grow and turn green. In the spirit of this glorious season, I created DIY handmade paper made from junk mail, scraps of paper, and natural elements.
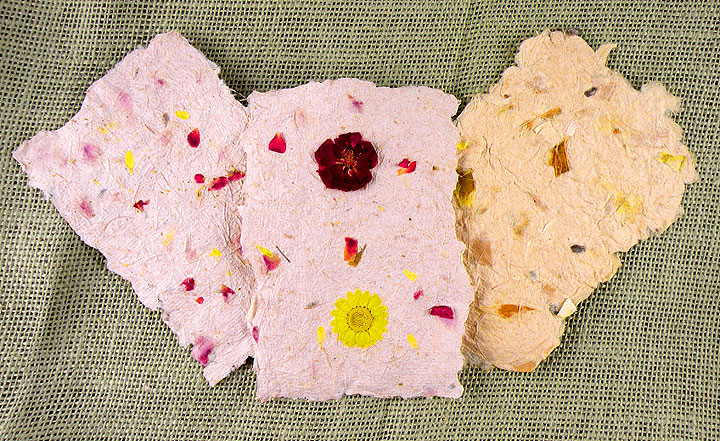
I embedded flower petals, leaves, and flower seeds into each page to give it a pretty spring design. It is so versatile, it can be used for note cards, birthday cards, or anything else where you want to use natural paper. This is the ultimate reuse project. It transforms waste paper into something beautiful that can be recycled again by planting it in the ground because the flower seed will sprout and grow. As long as you want to part with the beautiful paper.
Here’s how to make handmade paper!
First, you will need to make a screen that also acts as the form for the paper. This can easily be done with things you may already have on hand. Once the screen is made, you can quickly and easily make paper whenever you want. This paper is a very kid-friendly craft as well and is a lot of fun to see how the bits of junk mail are transformed into beautiful, handmade paper.
Materials:
For the Screen
- A piece of a mesh screen (window screen will work)
- Plastic Storage lid or picture frame
- Duct Tape
- Large plastic pan
For the Paper
- Blender
- Scrap Paper from the printer
- Pieces of a brown paper bag
- Natural rope or twine
- Flower Petals
- Flower Seeds
- Ground Nutmeg or Cinnamon
- Towels
- Drying Rack (a cookie rack will work)
How to Make Handmade Paper
To make the screen you can use either an old picture frame or take a plastic lid from a disposable storage container and cut out the middle with either scissors or an X-Acto knife. Please note that the size of the opening in the frame will become the size of the paper.

- Cut a piece of plastic screen (available in rolls at the hardware store) slightly larger than the size of the frame or lid. Glue the screen onto the rim of the frame.

- Cut strips of Duct Tape and wrap them around the rim of the lid or frame. Make sure that the tape is overlapping the edge of the screen on both the top and bottom of the frame and there a no exposed edges.

That’s it you’re done with your frame! You can make different size frames for all shapes and sizes of paper.
Now it’s time to make the paper!
There is no special formula for how much paper you should use. To make these four pieces of 4 x 6-1/2 inch pieces of paper, I used two pieces of printer paper and ½ side of a small brown paper bag (about the size of a lunch bag). The hand-made paper is going to be thicker than normal paper. Depending on how thin you make your paper, the result will yield about ¾ the amount of scrap paper.
- Rip or cut paper into small 1 inch pieces and put it into a blender.
- Cut small ¼ inch pieces of rope or twine to add fibers and texture to the paper. You can also unravel the twine to add thinner fibers to the paper.
- Fill the blender with warm water to cover the paper scraps by about 1 inch. This will soften the paper fibers.
- Blend the paper on a high setting for about 30 seconds until only paper pulp remains. You may need to add more water if the pulp is too thick.
- Pour the paper pulp out into a large plastic pan with high sides. I like to use disposable plastic containers from the grocery store. Add water to the mix until you have a thin, soupy consistency.

- Now it is time to get creative – add crushed flower petals, leaves and your seeds. Any seeds will work. I poured an entire envelope of flower seeds into this size batch. You can use flowers, vegetables or herb seeds. If you would like to add more color to the paper, sprinkle a little nutmeg or cinnamon into the mix to add a nice scent and a natural look.
- You can either scoop some of the mix onto the screen with a spoon to begin making your paper or place the screen in the pan under the water to distribute the pulp onto the top of the screen. Think of it as panning gold. Use a spoon to smooth out the pulp until you have the desired thickness. Make sure the petals, seeds and leaves are evenly distributed.

- After the pulp is distributed on the screen, you can press flowers into the pulp.
- Flip the screen face down onto a thick towel and press on the screen side with another towel to remove excess water. The paper will assume the texture of the towel so make sure it doesn’t have a waffled pattern if that is not the look you are trying to achieve.

- Carefully remove the screen from the paper to avoid tearing. Test the paper to see if it is sturdy enough to gently lift the paper from the towel to place on a drying rack. The paper will take about a day to dry but will dry in a few hours if placed in the sun. You can also use a hairdryer if you can’t wait to see the result. If the edges start to curl, place the dry paper under some heavy books to smooth out.

Once you have made your first batch of paper, you will be a pro and will be coming up with your ideas on how to make new and interesting paper. Just be creative and have fun! Send me pictures of your paper. I would love to see them.